Easy Ways to Create Labels in Word: A Step-by-Step Guide for 2025
Create Labels in Word: A Step-by-Step Guide for 2025
Creating labels in Word is one of the most practical uses of this versatile software, making it an ideal choice for both personal and business needs. Whether you want to make labels for products, mailing addresses, or organization purposes, this guide will walk you through the steps to **create labels in Word** easily. We’ll explore options available in **Word 365**, provide tips on label design, and offer quick methods to get your labels printed.
Understanding Word Label Options
Before diving into the steps to **create labels in Word**, it’s essential to understand the different **Word label options** available at your disposal. Word offers various templates, making it easy to start a project without needing extensive design skills. You can begin by navigating to the **mailings** tab and exploring the **Word mailing labels** feature. This option provides pre-defined sizes that correspond to many common label products available in stores, allowing you to select a template based on the labels you have on hand. This process not only saves time but also ensures that your labels will have a professional appearance.
Choosing a Label Template in Word
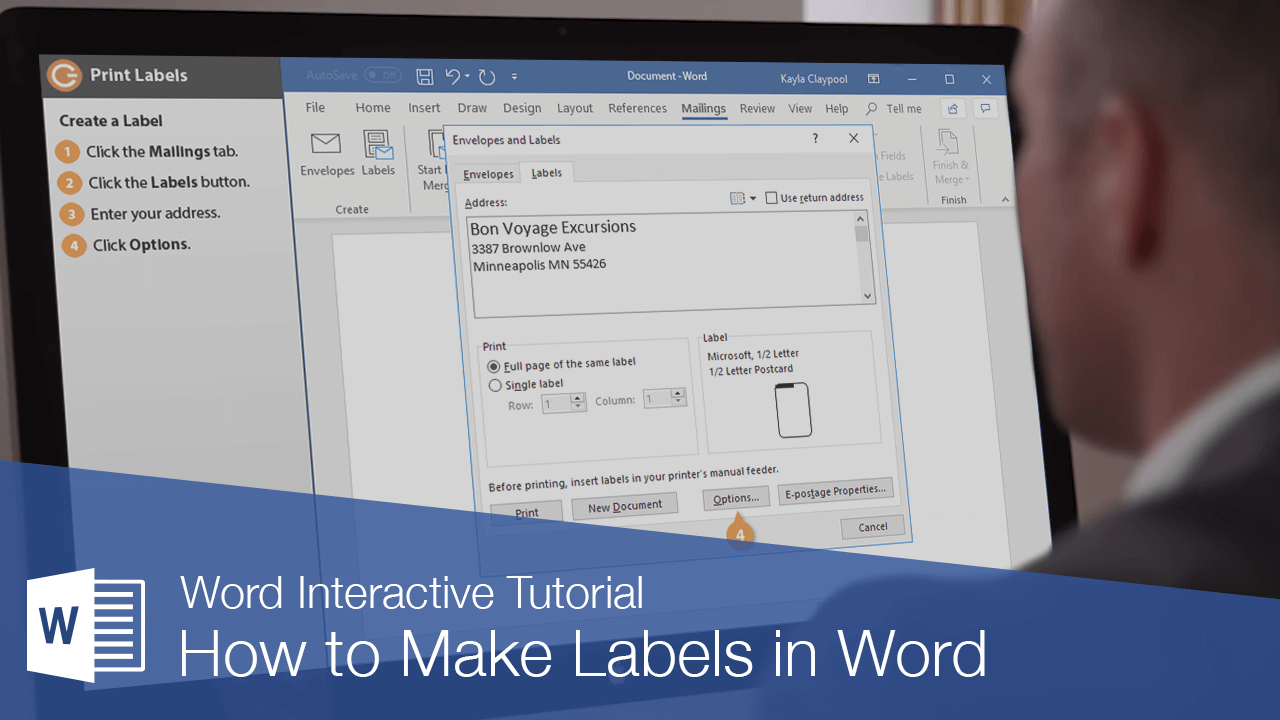
To select a **label template in Word**, follow these steps:
- Click on the **Mailings** tab in the ribbon.
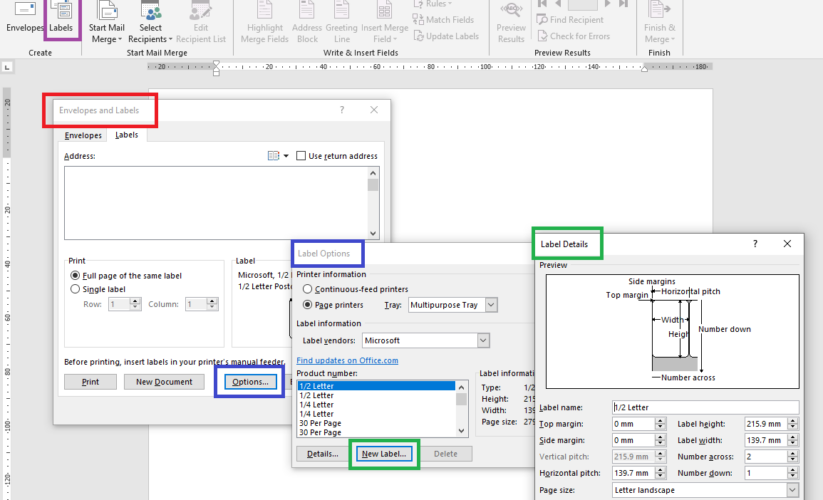
- Select **Labels** from the Create group. This opens the Envelopes and Labels dialog box.
- Go to the **Options** button to choose the specific type of label you want. Here, you can navigate through different manufacturers to find the right label format.
Once you have selected the right template, you can customize it to align with your brand or personal aesthetic. Remember that using a proper template minimizes the chance of misalignment when printing, thereby helping you utilize your resources wisely.
Customizing Labels in Word
Customizing your labels allows you to add a personal touch or brand identity. To **customize labels in Word**, follow these tips:
- Change the **font styles**, sizes, and colors to match your business branding.
- Add logos or graphics that resonate with your label’s purpose using the **Insert** tab.
- Utilize **text boxes** for positioning text creatively or for creating a unique shape.
Keep in mind that the layout and design of your label can greatly affect its readability, so make sure the information presented is clear and visible from a distance.
Making Labels Using Word: The Step-by-Step Process
Now that you have familiarized yourself with the **label template in Word**, let’s go through the specific steps to **make labels using Word**.
Step-by-Step Guide to Build Labels in Word
Here’s how to **build labels in Word** from scratch:
- Open a **new Word document** and go to the **Mailings** tab.
- Click on **Labels**, then enter the desired information for the label in the **Address** field.
- Select **Options** to choose your label brand and product number. Click **OK**.
- Use the **New Document** button. A document containing your labels will automatically open, ready for editing.
Following these steps can streamline the label-making process and save you time. Ensure your text is neatly applied through justified alignment for a professional finish. Enjoy the flexibility of using the spacing options to arrange your information effectively before printing.
Print Labels from Word
Printing your labels is the final step in this process. To ensure a successful print job:
- Go to **File > Print** and review the print settings. Ensure you’ve selected your label template correctly.
- Load your labels into the printer tray appropriately according to the printer’s specification.
- Use the **Print a Test Page** feature to check if the alignment is correct before proceeding to print the entire batch.
This careful planning will help avoid costly misprints while providing high-quality, professionally printed labels for your needs.
Using Word for Labels: Additional Features
Exploring advanced features in Word can significantly enhance your label-making capabilities. Here are some additional potentials when **using Word for labels**.
Incorporating Mail Merge for Bulk Labels
One of the greatest advantages of Microsoft Word is its **mail merge** feature. **Word mail merge labels** allow you to create bulk labels effortlessly. To utilize this:
- Prepare a data source in Excel that contains addresses.
- In Word, navigate to the **Mailings** tab and select **Start Mail Merge**.
- Select **Labels**, and once again choose the appropriate label options.
- Use the **Select Recipients** feature to connect to your Excel list.
- Add the address fields to your label and preview before printing.
This feature is incredibly useful for businesses sending out mass mail and helps streamline large-scale operations.
Editing Labels in Word for Quick Adjustments
Editing labels in Word is straightforward. You can easily modify text, change the layout, and adjust the design based on real-time feedback. Here’s the process for **editing labels in Word**:
- Open the document created for labels.
- Make necessary adjustments through **Highlighting** the text.
- Utilize the **Drawing Tools** or **Picture Tools** to reposition any graphics or logos.
Ensuring your labels are up to date and well-designed can help improve consumer recognition and branding, making it essential to utilize these tools to manage your documents effectively.
Key Takeaways
- Choosing the right **label template in Word** can save you considerable time while providing a professional finish.
- Customizing your labels can enhance branding and make a memorable impression for businesses.
- Utilize features like **mail merge** for bulk production and quick adjustments for maintaining label relevance.
- Make careful print setups avoid unnecessary resource wastage during production runs.
FAQ
1. How can I create custom labels in Word from scratch?
To create custom labels in Word from scratch, start by opening a new document and using the **Mailings** tab. Select **Labels**, input your text, and choose according to your desired size and design. Using text boxes can help position your text creatively. Always preview before printing to ensure quality.
2. What are the common label layouts in Word?
Common label layouts in Word vary by purpose. Some popular layouts include address labels, product labels, and organizational labels. You can customize these layouts according to your needs by adjusting dimensions and border options.
3. Can I print different designs on single sheets of label paper?
Yes, you can print different designs on single sheets of label paper by creating separate sections within your label document or by using the **mail merge** feature, which allows for various designs when sourced from a list.
4. What should I consider when designing labels for products?
When designing labels for products, consider the label dimensions, clarity of text, brand colors, and the impact of visuals. Everything must be clear, engaging, and appropriate for your target audience to ensure readability and appeal.
5. Is there a way to automate label generation in Word?
Yes, you can automate label generation in Word using macros. This allows for batch processing and efficiency, particularly helpful in businesses where generating large quantities of labels is required regularly.
6. How can I create mailing labels using an Excel database?
To create mailing labels using an Excel database, you’ll need to set up your list in Excel, then in Word, use the **Mailings** tab, select **Start Mail Merge**, and connect to your Excel document. This will pull the data directly to populate your labels efficiently.
7. Where can I find additional label templates for Word?
You can find additional label templates online, including on Office’s official template library, third-party sites offering free or premium templates, or create your own based on specific dimensions that suit your project needs.